Setting up
Raspberrypi in the headless mode - without a separate monitor, keyboard, mouse
and a router is just simple.
We will just need a laptop (tested on laptop running Linux Mint 18 Cinnamon 64bit) an Ethernet cable, SD card (>4GB) a card reader and of course the humble pi.
This method also allows you to configure the wifi on pi using command line from the laptop.
This process has
been tested with NOOBSv2 that installs Rasbian Jessie 4.4
Note:If you dont
have Linux Mint installed on your laptop you still can use this method to
connect to pi - create a Linux Mint live USB and use, detailed steps can be
found on the net.
So lets get started :)
1) Copying NOOBS to SD card
==================================================
Download the copy of NOOBS from RaspberryPi page.
Prepare the SD card and copy the files on to the SD card as
detailed here.
Eject the SD card and plug it again to the laptop
2) Edit file on SD card
==================================================
On the Sd card root folder edit the file recovery.cmdline to add silentinstall to the arguments list as shown below.
Add silentinstall to the end.
runinstaller quiet ramdisk_size=32768 root=/dev/ram0 init=/init vt.cur_default=1 elevator=deadline silentinstall
Save and eject the SD card properly.
Note:It is preferable to use a text editor such as notepad++ if
you are doing it on a Windows based PC.
3) Installing the OS - Rasbian on pi in headless mode
===============================
Insert the SD card into pi and power up pi.Now sit back and relax.
:)
Please do not
connect any other peripherals (Ethernet
cable,Wifi dongle, Keyboard, Mouse) to the pi during installation.Its just a
precaution to ensure that your pi's power adapter is not distured.
When the green
(status led) of pi stops blinking and stays like that you can safely assume
that the installation is complete. The Rasbian Jessie 4.4 installation on a
RaspberryPi 2b required about 30
minutes. :)
4) Setting the Ethernet properties of the Laptop
====================================
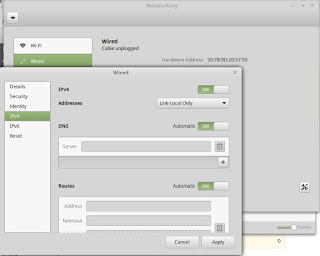
Now configure the Wired connection properties of the Laptop to
connect to raspberrypi
On Linux Mint --
Menu >
Network > Wired > click the spanner button on the bottom right corner
(The network
settings can also be launched using the network manager applet at the bottom
right of the screen)
On Network settings > Wired
IPv4 > Addresses > change from Automatic DHCP to Link-Local
only
DNS :ON
Routes:ON
leave the rest of the setting in their default values
Apply
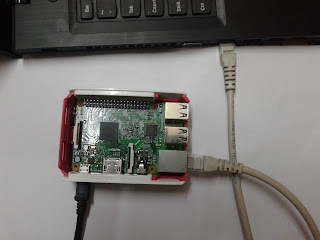
Now connect the laptop and Raspberrypi using
Ethernet cable
5) SSH to Raspberrypi and find its ip
===================================
Luckily SSH is enabled by default on Rasbian Jessie 4.4
Open terminal and start putty
putty
host name: raspberrypi.local
port: 22
click open
login as:pi
## default login
password:raspberry ## default password
On the terminal pi@raspberrypi type
hostname -I ## This is a much simpler way to obtain the pi's ip
ifconfig
## or else use ifconfig to get pi's IP (etho> inet addr) for example
169.254.1.193
## Please note down the ip of the pi
for example 169.254.1.193
Note:If you do not have putty installed on laptop use
sudo apt-get install putty
6) Configure wifi on Raspberrypi
=========================
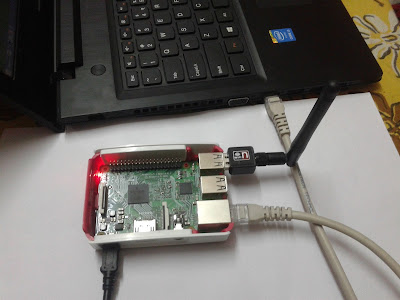
Plug in the wifi dongle to Raspberrypi. This has been tested with
raspberrypi 2b, the raspberrypi3b had wifi onboard :)
Type on the terminal pi@raspberrypi
wpa_cli status
If you receive a mesage something like this "Failed to connect to non-global ctrl_ifname: (null) error: No such file or directory" Your wifi dongle doesn't work or doesn't support wifi connections.
You are lucky if you get the following message:)
pi@raspberrypi:~$ wpa_cli status
Selected interface 'wlan0'
wpa-State=INACTIVE
address=xx:xx:xx:xx:xx:xx
#hardware address
uuid=xxxxxxxx-xxxx-xxxx-xxxx-xxxxxxxxxxxxxxxx
To make the wifi configuration simpler
enter the interactive mode type
wpa_cli
Create a new network using
add_network
You will get an integer value as the network id in return. For instance, if its your first network you get a 0 and so on.
To configure the network enter the following.Replace the 0 with your network id obtained from add_network.
set_network 0 ssid "mywifissid"
set_network 0 psk "mywifipassword"
Finally to connect to the wifi network type
select_network 0
Type quit to exit
That's it :) - wifi is ready on pi
7) Install VNC server on Raspberrypi for
remote desktop connection
================================================
sudo apt-get update
sudo apt-get install tightvncserver
vncserver :1 ##launch vnc
server on pi
You will have to set the password for the connection.
In case you forget the password use sudo vncpasswd to change vnc password. :)
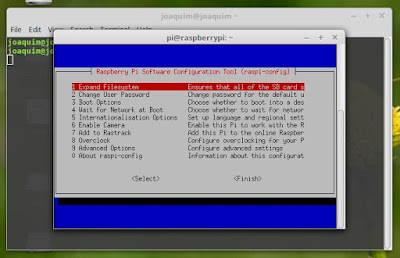
Now lets configure pi a bit -
sudo raspi-config
Go to Advanced options >VNC >enable ## enable
VNC server
8) Install vnc viewer on the laptop
==========================
sudo apt-get install xtightvncviewer
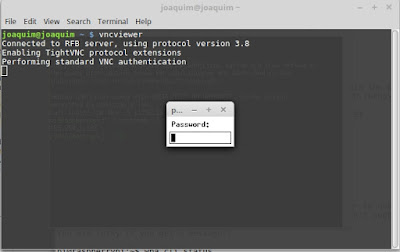
9) Connect to pi using VNC viewer
==========================
Launch another terminal on the laptop/pc
vncviewer
enter ip of the raspberry pi optained from step 2
169.254.1.193:1 ( ip:1)
enter password: your password
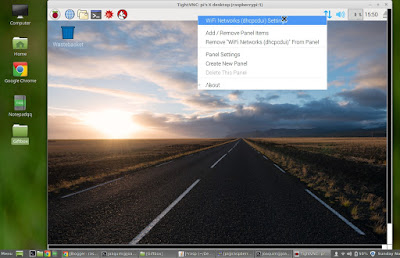
10) Wifi problem on Pi?
=================
If your wifi is not connected, just set it up from the wifi
setting gui on pi as shown below
10) Launch VNC server on Raspberrypi
boot
===================================
To configure for VNC server auto start as a service when the Pi
boots up:
Open any text editor in pi (nano/vi) to create a file to auto
start Tight VNC Server
sudo nano /etc/init.d/tightvncserver
Type in the following in the file :
#!/bin/bash
### BEGIN INIT INFO
# Provides: tightvncserver
# Required-Start: $syslog
# Required-Stop: $syslog
# Default-Start: 2 3 4 5
# Default-Stop: 0 1 6
# Short-Description: vnc server
# Description:
#
### END INIT INFO
#!/bin/sh
# /etc/init.d/tightvncserver
# Set the VNCUSER variable to the name of the user to start
tightvncserver under
VNCUSER='pi'
case "$1" in
start)
su $VNCUSER -c '/usr/bin/tightvncserver :1'
echo "Starting TightVNC server for
$VNCUSER"
;;
stop)
pkill Xtightvnc
echo "Tightvncserver stopped"
;;
*)
echo "Usage: /etc/init.d/tightvncserver
{start|stop}"
exit 1
;;
esac
exit 0
Press Ctrl+x, then Y to save the file
Edit the permissions of this file to make it executable and active
sudo chmod 755 /etc/init.d/tightvncserver
sudo update-rc.d tightvncserver defaults
sudo reboot
That's it you are done :)
Now on pi reboot/power up you need to carry out only steps 5 and 9 to log on to your raspberrypi.
 |
| Raspberry Pi is a trademark of the Raspberry Pi Foundation |
References
==========
http://raspberrypi.stackexchange.com/questions/15192/installing-raspbian-from-noobs-without-display
http://raspberrypi.stackexchange.com/questions/27676/auto-start-tightvncserver-on-raspberry-pi-2
https://www.raspberrypi.org/forums/viewtopic.php?t=7395
http://www.codefoster.com/pi-wifi/
http://www.howtogeek.com/167425/how-to-setup-wi-fi-on-your-raspberry-pi-via-the-command-line/






No comments:
Post a Comment