26 November 2016

Raspberrypi and Python programming - course

The Raspberry Pi Platform and Python Programming for the Raspberry Pi 

The Raspberry Pi Platform and Python Programming for the Raspberry Pi is an online course offered on Coursera. It gets you started with raspberrypi, linux fundamentals, python programming and raspberrypi i/o. You can either audit the course for free or upgrade by paying a fee for access to additional material.

Faculty : 
Ian Harris
Associate Professor
Univ of California,Irvine


11 November 2016

Python v/s Matlab v/s other solutions

How does Python compare to other solutions?

The original article can be found here at the Scipy introduction

Compiled languages: C, C++, Fortran...
===============================
Pros:
Very fast. For heavy computations, it’s difficult to outperform these languages.
Cons:
Painful usage: no interactivity during development, mandatory compilation steps, verbose syntax, manual memory management. These are difficult languages for non programmers.

Matlab scripting language
=====================
Pros:
Very rich collection of libraries with numerous algorithms, for many different domains. Fast execution because these libraries are often written in a compiled language.
Pleasant development environment: comprehensive and help, integrated editor, etc. Commercial support is available.
Cons:
Base language is quite poor and can become restrictive for advanced users.
Not free.

Julia
====
Pros:
Fast code, yet interactive and simple.
Easily connects to Python or C.
Cons:
Ecosystem limited to numerical computing.Still young.

Other scripting languages: Scilab, Octave, R, IDL, etc.
=========================================
Pros:
Open-source, free, or at least cheaper than Matlab.
Some features can be very advanced (statistics in R, etc.)
Cons:
Fewer available algorithms than in Matlab, and the language is not more advanced. Some software are dedicated to one domain. Ex: Gnuplot to draw curves. These programs are very powerful, but they are restricted to a single type of usage, such as plotting.

Python
======
Pros:
Very rich scientific computing libraries
Well thought out language, allowing to write very readable and well structured code: we “code what we think”.
Many libraries beyond scientific computing (web server, serial port access, etc.)
Free and open-source software, widely spread, with a vibrant community.
A variety of powerful environments to work in, such as IPython, Spyder, Jupyter notebooks,Pycharm
Cons:
Not all the algorithms that can be found in more specialized software or toolboxes.

7 November 2016

Configure wifi on raspberrypi remotely

1) Open a SSH connection with raspberrypi
To set up an SSH please use PuTTY. 
For Windows PC's download PuTTY from here.Just double click the putty.exe to run PuTTY. 
For Linux PC's open terminal and install PuTTY
sudo apt-get install putty
To run PuTTY type "putty" in the terminal

In the PuTTY configuration enter --
Host name: raspberrypi.local    #linux PC's
Host name: raspberrypi          #Windows PC's
Port :22
Leave all others as default values
Click open

A terminal opens up
login in as: pi
Password : raspberry

2) Configure wifi on Raspberrypi
Plug in the wifi dongle to Raspberrypi. This has been tested with raspberrypi 2b, the raspberrypi3b had wifi onboard :)

wifi on raspberrypi
Type on the terminal pi@raspberrypi

wpa_cli status

If you receive a message something like this "Failed to connect to non-global ctrl_ifname: (null)  error: No such file or directory" Your wifi dongle doesn't work or doesn't support wifi connections.

You are lucky if you get the following message:)

pi@raspberrypi:~$ wpa_cli status
Selected interface 'wlan0'
wpa-State=INACTIVE
address=xx:xx:xx:xx:xx:xx    #hardware address

uuid=xxxxxxxx-xxxx-xxxx-xxxx-xxxxxxxxxxxxxxxx

raspberrypi wifi configuration

To make the wifi configuration simpler, enter the interactive mode type
wpa_cli

Create a new network using
add_network

You will get an integer value as the network id in return. For instance, if its your first network you get a 0 and so on.

To configure the network enter the following.Replace the 0 with your network id obtained from add_network.

set_network 0 ssid "mywifissid"
set_network 0 psk "mywifipassword"

Finally to connect to the wifi network type
select_network 0

Type quit to exit

That's it :) - you have configured wifi on pi remotely.


raspberrypi wifi configuration


6 November 2016

Raspberrypi to Windows connection

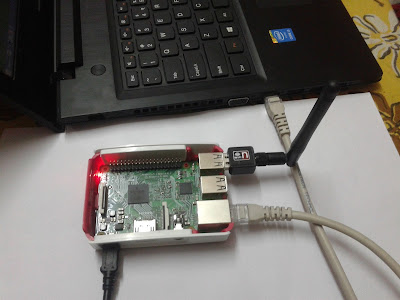
The steps to connect raspberrypi to Windows pc using an ethernet is described here. Once the connection is setup you can use your laptop's keyboard and monitor to connect to pi. cool :)

The steps assume that raspberrypi already has internet connectivity via wifi.

1) Windows LAN properties setting
Open Windows LAN properties
On Networking >IPv4 >
Check the follwing--
Obtain an IP address automatically
Obtain a DNS server address automatically


2) SSH to Raspberrypi from Windows

Luckily SSH is enabled by default in Rasbian Jessie 4.4. First download PuTTY from here.Just double click the putty.exe to run PuTTY. 

putty on windows


Enter the following in the PuTTY window
host name : raspberrypi
port : 22
Leave all other setting in their default values.
click open

3) Find the raspberry pi's IP
On the terminal type
hostname -I             


## The first ip listed is the ethernet ip and the second one is of the wifi on pi


find raspberrypi ip

Note down the ip of the ethernet connection

4) Install and configure VNC server on pi
To install VNC server on raspberrypi on the terminal type
sudo apt-get update
sudo apt-get install tightvncserver
vncserver :1  ##launch vnc server on pi 
You will have to set the password for the connection.

In case you forget the password use sudo vncpasswd to change vnc password. :)

Now lets configure pi a bit -

sudo raspi-config  

Go to Advanced options >VNC >enable    ## enable VNC server


enable vncserver on pi


5) Launch VNC server on Raspberrypi boot
To configure for VNC server auto start as a service when the Pi boots up:
Open any text editor in pi (nano/vi) to create a file to auto start Tight VNC Server

sudo nano /etc/init.d/tightvncserver

Type in the following in the file :

#!/bin/bash
### BEGIN INIT INFO
# Provides:          tightvncserver
# Required-Start:    $syslog
# Required-Stop:     $syslog
# Default-Start:     2 3 4 5
# Default-Stop:      0 1 6
# Short-Description: vnc server
# Description:
#
### END INIT INFO

#!/bin/sh
# /etc/init.d/tightvncserver
# Set the VNCUSER variable to the name of the user to start tightvncserver under
VNCUSER='pi'
case "$1" in
  start)
    su $VNCUSER -c '/usr/bin/tightvncserver :1'
    echo "Starting TightVNC server for $VNCUSER"
    ;;
  stop)
    pkill Xtightvnc
    echo "Tightvncserver stopped"
    ;;
  *)
    echo "Usage: /etc/init.d/tightvncserver {start|stop}"
    exit 1
    ;;
esac
exit 0

Press Ctrl+x, then Y to save the file

Edit the permissions of this file to make it executable and active

sudo chmod 755 /etc/init.d/tightvncserver
sudo update-rc.d tightvncserver defaults
sudo reboot

6) Download and configure VNC viewer for Windows
Download VNC viewer from here. Double click the downloaded exe file to launch vnc viewer.

File>New connection
Enter the IP of Pi (obtained from step 3) followed by :1
If pi's Ip is 169.254.1.193, we enter 169.254.1.193:1

After pi reboot in step 5 you need to again find the pi's IP (steps 2-3)

If an error message comes up enter the ip as
169.254.1.193:5901


vnc viewer on windows

Now go to expert tab of the connection and change ColorLevel from pal8 to full.

Click OK


Double click the connection created.Please be patient...
Enter vnc password created in step 4 when prompted.


And there you are on pi.........


Pywavelets install on Linux

PyWavelets is free and Open Source wavelet transform software for the Python programming language. Follow these steps to install PyWavelets on Linux.

OS updates
==========
sudo apt-get dist-upgrade
sudo apt-get update
sudo apt-get upgrade

Python esential updates
=======================
sudo apt-get install libblas-dev        
sudo apt-get install liblapack-dev      
sudo apt-get install python-dev        
sudo apt-get install libatlas-base-dev  
sudo apt-get install gfortran          
sudo apt-get install python-setuptools
sudo apt-get install python3-setuptools

Pywavelets
=================
sudo apt-get install build essential
sudo apt-get install python-wheel
sudo apt-get install python3-dev
sudo pip3 install Pywavelets
sudo apt-get install python-dev
pip install PyWavelets


pywavelets install on linux


Scikit-learn install on Linux

Scikit-learn is an open source Python library that implements a range of machine learning, preprocessing, cross-validation and visualization algorithms. Follow these steps to install scikit-learn on Linux.

OS updates
==========
sudo apt-get dist-upgrade
sudo apt-get update
sudo apt-get upgrade

Python essential updates
=======================
sudo apt-get install libblas-dev        
sudo apt-get install liblapack-dev      
sudo apt-get install python-dev        
sudo apt-get install libatlas-base-dev  
sudo apt-get install gfortran          
sudo apt-get install python-setuptools
sudo apt-get install python3-setuptools

Scikit-learn
============
sudo pip3 install scikit-learn           # for python 3

Optional python packages
===================================
In case of errors please install these optional Python packages, it will fix.

sudo apt-get install python-dev libxml2-dev libxslt1-dev zlib1g-dev python3-dev
sudo apt-get install python-setuptools

In most cases it seems only build-essential and python-dev  are only required.
sudo apt-get install build-essential
sudo apt-get install python-dev


install scikit-learn on linux


Scipy install on Python

SciPy (pronounced “Sigh Pie”) is a Python-based ecosystem of open-source software for mathematics, science, and engineering. Follow these steps to install Scipy package on Python.

OS updates
==========
sudo apt-get dist-upgrade
sudo apt-get update
sudo apt-get upgrade

Python esential updates
=======================
sudo apt-get install libblas-dev        
sudo apt-get install liblapack-dev      
sudo apt-get install python-dev        
sudo apt-get install libatlas-base-dev  
sudo apt-get install gfortran          
sudo apt-get install python-setuptools
sudo apt-get install python3-setuptools

Scipy
======
sudo apt-get install python-scipy            #for python 2
sudo apt-get install python-scipy --fix-missing

sudo pip3 install scipy                      #for python 3


Optional python packages
===================================
In case of errors please install these optional Python packages, it will fix.

sudo apt-get install python-dev libxml2-dev libxslt1-dev zlib1g-dev python3-dev
sudo apt-get install python-setuptools

In most cases it seems only build-essential and python-dev are only required.

sudo apt-get install build-essential
sudo apt-get install python-dev
python-scipy on raspberrypi

VNC connection with Raspberrypi and Linux Mint

Virtual Network Computing (VNC) is a graphical desktop sharing system that uses the Remote Frame Buffer protocol (RFB)to remotely control another computer. It transmits the keyboard and mouse events from one computer to another, relaying the graphical screen updates back in the other direction, over a network. (source:https://en.wikipedia.org/wiki/Virtual_Network_Computing)

The steps to setup a VNC connection to Raspberrypi from a laptop running linux mint are described here

1) Install VNC server on Raspberrypi for remote desktop connection
================================================
sudo apt-get update
sudo apt-get install tightvncserver
vncserver :1  ##launch vnc server on pi 
You will have to set the password for the connection.

In case you forget the password use sudo vncpasswd to change vnc password. :)

Now lets configure pi a bit -

sudo raspi-config  

Go to Advanced options >VNC >enable    ## enable VNC server


enable vncserver on pi


2) Find out Raspberrypi's IP
=====================================
Open a terminal in pi and type

hostname -I             ## This is a much simpler way to obtain the pi's ip
ifconfig                   ## or else use ifconfig to get pi's IP (etho> inet addr) for example 169.254.1.193

##  
Please note down the ip of the pi for example 169.254.1.193

3) Install vnc viewer on the laptop/PC
=====================================
sudo apt-get install xtightvncviewer

4) Connect to pi using VNC viewer
==========================
Launch another terminal on the laptop/pc
vncviewer
enter ip of the raspberry pi optained from step 2
169.254.1.193:1  ( ip:1)
enter password: your password
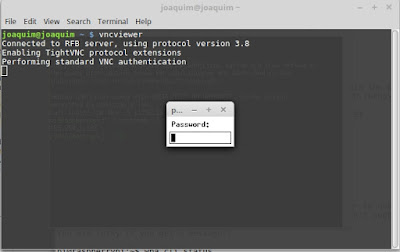

vnc connection to pi


vnc connection problem raspberrypi


5) Launch VNC server on Raspberrypi boot
===================================
To configure for VNC server auto start as a service when the Pi boots up:
Open any text editor in pi (nano/vi) to create a file to auto start Tight VNC Server

sudo nano /etc/init.d/tightvncserver

Type in the following in the file :

#!/bin/bash
### BEGIN INIT INFO
# Provides:          tightvncserver
# Required-Start:    $syslog
# Required-Stop:     $syslog
# Default-Start:     2 3 4 5
# Default-Stop:      0 1 6
# Short-Description: vnc server
# Description:
#
### END INIT INFO

#!/bin/sh
# /etc/init.d/tightvncserver
# Set the VNCUSER variable to the name of the user to start tightvncserver under
VNCUSER='pi'
case "$1" in
  start)
    su $VNCUSER -c '/usr/bin/tightvncserver :1'
    echo "Starting TightVNC server for $VNCUSER"
    ;;
  stop)
    pkill Xtightvnc
    echo "Tightvncserver stopped"
    ;;
  *)
    echo "Usage: /etc/init.d/tightvncserver {start|stop}"
    exit 1
    ;;
esac
exit 0


Press Ctrl+x, then Y to save the file

Edit the permissions of this file to make it executable and active

sudo chmod 755 /etc/init.d/tightvncserver
sudo update-rc.d tightvncserver defaults

sudo reboot

That's it you are done :)
5 November 2016

Install Python packages on raspberrypi

Just follow these simple steps to install Python packages - Numpy, Scipy, Scikit-learn, Matplotlib and Pywavelets on Raspberrypi

OS updates
==========
sudo apt-get dist-upgrade
sudo apt-get update
sudo apt-get upgrade

Python esential updates
=======================
sudo apt-get install libblas-dev        
sudo apt-get install liblapack-dev      
sudo apt-get install python-dev        
sudo apt-get install libatlas-base-dev  
sudo apt-get install gfortran          
sudo apt-get install python-setuptools
sudo apt-get install python3-setuptools

Numpy
======
sudo apt-get install numpy

Scipy
======
sudo apt-get install python-scipy            #for python 2
sudo apt-get install python-scipy --fix-missing
sudo pip3 install scipy                      #for python 3

Scikit-learn
============
sudo pip3 install scikit-learn           # for python 3

Matplotlib
==========
sudo apt-get install python-matplotlib

Pywavelets
=================
sudo apt-get install build essential
sudo apt-get install python-wheel
sudo apt-get install python3-dev
sudo pip3 install Pywavelets
sudo apt-get install python-dev
pip install PyWavelets

nothing else work clone the git and install
===========================================
sudo apt-get install git
sudo git clone git://github.com/scipy/scipy.git scipy
sudo git clone  git://github.com/scikit-learn/scikit-learn.git
sudo git clone https://github.com/PyWavelets/pywt.git PyWavelets

change dir to cloned directory and execute
sudo python setup.py install

Optional python packages
===================================
In case of errors please install these optional Python packages, it will fix.

sudo apt-get install python-dev libxml2-dev libxslt1-dev zlib1g-dev python3-dev
sudo apt-get install python-setuptools

In most cases it seems only build-essential and python-dev  are only required.
sudo apt-get install build-essential
sudo apt-get install python-dev

Remove unnecessary packages and free space
============================================
sudo apt-get purge libreoffice wolfram-engine sonic-pi scratch
sudo apt-get autoremove

Libre Offfice doesn't go? Give this a try :)

sudo apt-get remove --purge libreoffice*
sudo apt-get clean
sudo apt-get autoremove


scikit-learn scipy on linux


scipy scikit-learn install